I know, I know, I'm slack. But it's christmas, I'm off work, I have mum visiting, and no internet at home STILL. But, I hope everyone is enjoying their holiday season, I hope not too many of you have to work. I'll be back in the new year to share more stuff with you (including different things you can make to get rid of that darned christmas ham).
Take care, stay safe, see you all again soon.
Anna
Thursday, December 28, 2006
Friday, December 08, 2006
Peanut Cookies
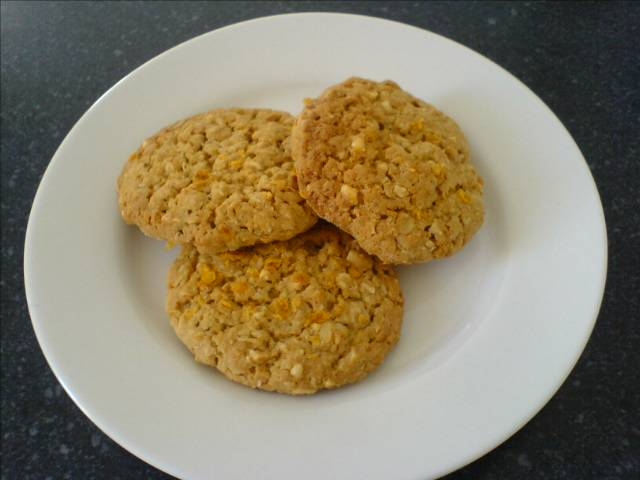
Ah, I'm so lazy! Lots of cooking, lots of eating, but haven't blogged anything. My excuse is that I STILL haven't set up my home computer, much less got a net connection happening:that will all be sorted out over Christmas. But for now -- COOKIES!!!
I can't for the life of me remember where I found the recipe for these, but they're in my "foody" database I’m compiling and I’ve made them twice now to resounding reviews. They’re really easy too, which is always good in my book!
Peanut Cookies
125g butter (I originally used "no added salt" butter - I recommend you go the normal stuff)
1/2 cup brown sugar, firmly packed
1 egg
1 cup self raising flour
1/2 tsp bicarb soda (I use about 1/4 of a teaspoon)
1/2 cup rolled oats
1/2 cup coconut
1/2 cup salted peanuts (I didn’t have any salted peanuts, so used chopped nuts instead - also tasty, but again, if you’ve got some salted nuts handy, use those)
1/3 cup finely crushed cornflakes
crushed cornflakes, extra
Preheat oven to 180C.
Cream the butter and sugar until light and fluffy, then add the egg and beat well. Fold in sifted flour and bicarb soda. Add rolled oats, coconut, peanuts and cornflakes, mix well. Put teaspoon-fulls of mixture onto a lightly greased oven tray, allow room for spreading. If you're a little, uh, particular like me, roll the mixture into balls and then flatten them a bit, otherwise just dumping the mixture on the tray works fine. Sprinkle the extra corn flakes over the top. Bake in moderate oven 10-12 minutes or until golden brown.
Mm, peanut-y goodness!
Do I really need to add that if you have a nut allergy to stay away from this? It would seem obvious, but I've met some people who seem a sheep short of the full flock in the top paddock...
Friday, November 24, 2006
Eating Out: Pelican Bistro, Altona Bowling Club
Altona Bowling Club
113 Civic Pde, Altona 3018
When you want a good, honest, basic meal at a decent price in a relaxed environment surely you'll be hard-pressed to find a better place for it than in Pelicans Bistro at the Altona Bowling Club.
I'll admit: it was my father and his lady-friend (AKA: "Dad-Wench") who first introduced me to this lovely establishment some 12 months ago. It's their place of choice for dinner at certain times of the year - such as when Dad-Wench (a member of the club) receives her free meal in the month of her birthday, or when she bowls the best that week. And invariably, as I live only 10 or 15 minutes from either of their houses, I'm invited along.
It is very much a family-oriented place, and quite modest as you might expect from your local "club". The menu is not overly large however each and every dish is well prepared and, for the cost, you could hardly ask for better. For dinner there is a selection of about a dozen $10 dishes, and only slightly fewer on the $8 menu. There's also a kiddies menu. All meals are served, as you may expect, with a choice of either chips and salad or roast vegies. Our meals follow and we were, as always, incredibly happy with our chosen nosh.

On our last visit I chose the roast beef with vegies - I love a good roast! Not much wrong at all with my meal - as you can see there was plenty on the plate, the vegies were neither over-cooked (on the part of the roasted ones) nor soggy (on the part of the others) and when I asked if I could have an extra dollop of gravy, since I love gravy, the ladies in the kitchen cheerfully obliged. $10 for all this!

My father chose to be different on this occasion - he chose the chilli chicken tenders with chips and salad. Unfortunately I think that he'd already swiped one of the chicken pieces before I could burgle the plate for a photo-op, but as you can see the presentation was nice, and again there was plenty of food there for a light meal. I can't remember whether this was on the $8 or $10 menu, but either way Dad was quite happy.

Dad-Wench had her usual - the fisherman's selection. Not being much of a seafood person myself I'm not entirely sure what she got - there's definitely some calamari there, also a few large-ish prawns, possibly a scallop and a few fish-bites. Don't let the packaged tartare sauce sway you. Again, for $10 including salad and chips, not a bad deal at all. Although I notice that, on this particular visit, the salads weren't quite up to their usual standard… perhaps there had been more snacking than I'd noticed before I'd whipped out the camera!
The bistro is also open for lunch. So, in summary, if you're out in the west and want a good meal at a reasonable price, this should definitely be on your shortlist. It's also only a short drive from Altona beach, which is a lovely place to sit and watch the world go by as you digest.
(I had planned to put up a picture of the beach here, but Blogger won't let me, for some reason).
** Please note: the term Dad-Wench is used with utmost respect and affection. She is a lovely lady indeed, and I am more happy than you can believe that she and my father found each other. I'm not overly fussed about my own anonymity, however I would like to try and preserve at least a little of theirs, hence the pseudonym.
113 Civic Pde, Altona 3018
When you want a good, honest, basic meal at a decent price in a relaxed environment surely you'll be hard-pressed to find a better place for it than in Pelicans Bistro at the Altona Bowling Club.
I'll admit: it was my father and his lady-friend (AKA: "Dad-Wench") who first introduced me to this lovely establishment some 12 months ago. It's their place of choice for dinner at certain times of the year - such as when Dad-Wench (a member of the club) receives her free meal in the month of her birthday, or when she bowls the best that week. And invariably, as I live only 10 or 15 minutes from either of their houses, I'm invited along.
It is very much a family-oriented place, and quite modest as you might expect from your local "club". The menu is not overly large however each and every dish is well prepared and, for the cost, you could hardly ask for better. For dinner there is a selection of about a dozen $10 dishes, and only slightly fewer on the $8 menu. There's also a kiddies menu. All meals are served, as you may expect, with a choice of either chips and salad or roast vegies. Our meals follow and we were, as always, incredibly happy with our chosen nosh.
On our last visit I chose the roast beef with vegies - I love a good roast! Not much wrong at all with my meal - as you can see there was plenty on the plate, the vegies were neither over-cooked (on the part of the roasted ones) nor soggy (on the part of the others) and when I asked if I could have an extra dollop of gravy, since I love gravy, the ladies in the kitchen cheerfully obliged. $10 for all this!
My father chose to be different on this occasion - he chose the chilli chicken tenders with chips and salad. Unfortunately I think that he'd already swiped one of the chicken pieces before I could burgle the plate for a photo-op, but as you can see the presentation was nice, and again there was plenty of food there for a light meal. I can't remember whether this was on the $8 or $10 menu, but either way Dad was quite happy.
Dad-Wench had her usual - the fisherman's selection. Not being much of a seafood person myself I'm not entirely sure what she got - there's definitely some calamari there, also a few large-ish prawns, possibly a scallop and a few fish-bites. Don't let the packaged tartare sauce sway you. Again, for $10 including salad and chips, not a bad deal at all. Although I notice that, on this particular visit, the salads weren't quite up to their usual standard… perhaps there had been more snacking than I'd noticed before I'd whipped out the camera!
The bistro is also open for lunch. So, in summary, if you're out in the west and want a good meal at a reasonable price, this should definitely be on your shortlist. It's also only a short drive from Altona beach, which is a lovely place to sit and watch the world go by as you digest.
(I had planned to put up a picture of the beach here, but Blogger won't let me, for some reason).
** Please note: the term Dad-Wench is used with utmost respect and affection. She is a lovely lady indeed, and I am more happy than you can believe that she and my father found each other. I'm not overly fussed about my own anonymity, however I would like to try and preserve at least a little of theirs, hence the pseudonym.
Monday, November 20, 2006
Eating Out: Kenzan
Kenzan
Shop G28, GPO Building
250 Bourke Street, Melbourne
 I’m having a moment of confusion: my lunch was largely liquid, my drink was largely chewy, and I now have a definite “sloshy” feeling in my stomach. Hm, I’ll blame it on Monday.
But if it’s not Monday’s fault, then surely it must be Kenzan’s.
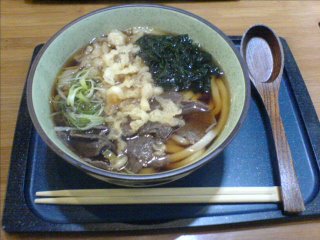
Kenzan is an absolute pearl of a restaurant in the GPO Building on Bourke Street with a relaxed feel, and offers some fantastic Japanese dining. Last week, when Madame Tummy Rumbles and I went for my inaugural visit, I tried the Niku Udon: paper-thin slices of beef with other bits and pieces in a clear-brown mushroom soup with thick udon noodles (pictured above). Full of flavour, so incredibly yummy, and slurping up the noodles was definitely the most fun. For $12 I feel it was well worth every cent.
On today’s trip to Kenzan I decided to try something that the Tummy Rumbler had recommended last week: some hand rolls and a bowl of miso soup; it’s a shame I didn’t get a picture of it, particularly when we had to try and roll our own! For the sum of $9 you can get two hand rolls (from their selection of fillings) and the bowl of soup. I had two teriyaki chicken rolls, my companion chose one salmon and an eel. The soup was excellent, as our initial slurps proved. When it came to the rolls… thankfully there are instructions on the packaging. You must roll your own fillings in the nori. Once you get the hang of it, it’s quite simple. And the bonus is that the nori stays quite crisp, instead of being soggy and chewy as you normally find with pre-made hand rolls.
So that accounts for the liquid in my meal, but “what about the chewy drink?” I hear you ask. Have you ever heard of Bubble Tea? Also known as Pearl Tea. I’ve done a quick search with Google for a website for a bubble tea maker/supplier, and I didn’t find much of real use for this blog. Have you ever heard of tapioca? Or sago? Imagine big, dark, chewy balls of that jiggling around the bottom of a cup of iced tea, or iced milk tea. Hm, I’m not describing it very well, am I! In any case, both TR and I fans of the bubble. So on the way back to the office we stopped to partake. There are so many flavours to choose from, but collectively I think we’ve now tried milky taro/yam, milky red tea, milky peanut, green tea, passionfruit tea, and green apple. So far we’ve been quite happy with all flavours! I know you can find places that sell bubble tea in most Westfield shopping centres but, particularly if you're near Chinatown in the CBD you'll have no trouble finding somewhere.
I have far too many things backed up to blog. But I'll get there, don't worry!
Shop G28, GPO Building
250 Bourke Street, Melbourne
 I’m having a moment of confusion: my lunch was largely liquid, my drink was largely chewy, and I now have a definite “sloshy” feeling in my stomach. Hm, I’ll blame it on Monday.
But if it’s not Monday’s fault, then surely it must be Kenzan’s.
Kenzan is an absolute pearl of a restaurant in the GPO Building on Bourke Street with a relaxed feel, and offers some fantastic Japanese dining. Last week, when Madame Tummy Rumbles and I went for my inaugural visit, I tried the Niku Udon: paper-thin slices of beef with other bits and pieces in a clear-brown mushroom soup with thick udon noodles (pictured above). Full of flavour, so incredibly yummy, and slurping up the noodles was definitely the most fun. For $12 I feel it was well worth every cent.
On today’s trip to Kenzan I decided to try something that the Tummy Rumbler had recommended last week: some hand rolls and a bowl of miso soup; it’s a shame I didn’t get a picture of it, particularly when we had to try and roll our own! For the sum of $9 you can get two hand rolls (from their selection of fillings) and the bowl of soup. I had two teriyaki chicken rolls, my companion chose one salmon and an eel. The soup was excellent, as our initial slurps proved. When it came to the rolls… thankfully there are instructions on the packaging. You must roll your own fillings in the nori. Once you get the hang of it, it’s quite simple. And the bonus is that the nori stays quite crisp, instead of being soggy and chewy as you normally find with pre-made hand rolls.
So that accounts for the liquid in my meal, but “what about the chewy drink?” I hear you ask. Have you ever heard of Bubble Tea? Also known as Pearl Tea. I’ve done a quick search with Google for a website for a bubble tea maker/supplier, and I didn’t find much of real use for this blog. Have you ever heard of tapioca? Or sago? Imagine big, dark, chewy balls of that jiggling around the bottom of a cup of iced tea, or iced milk tea. Hm, I’m not describing it very well, am I! In any case, both TR and I fans of the bubble. So on the way back to the office we stopped to partake. There are so many flavours to choose from, but collectively I think we’ve now tried milky taro/yam, milky red tea, milky peanut, green tea, passionfruit tea, and green apple. So far we’ve been quite happy with all flavours! I know you can find places that sell bubble tea in most Westfield shopping centres but, particularly if you're near Chinatown in the CBD you'll have no trouble finding somewhere.
I have far too many things backed up to blog. But I'll get there, don't worry!
Wednesday, November 15, 2006
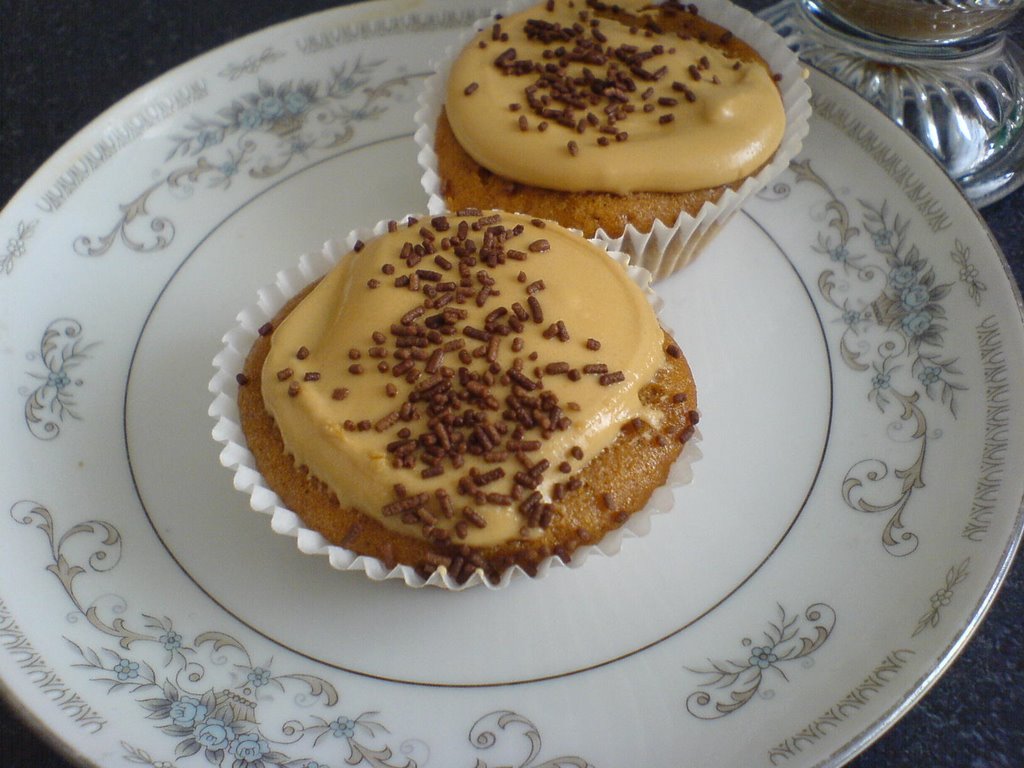
Coffee Cupcakes
 Do you remember the butter cake recipe I put up back in September? Here is something else you can do with it!
I decided I wanted to make cupcakes and had the batter all ready to go, then decided "hm, no, I want a flavour" and wondered what I could use. Chocolate? Nah, not in a chocolate mood. Coconut? No way. Coffee? Ooohhh yes!
So, take the butter cake recipe and add about 3 teaspoons of coffee powder to the flour. If you're like me and drink the "freeze dried" stuff that's fine - crush it up in either a mortar and pestle or through a strainer. You could also try dissolving it in the milk instead of adding it to the flour. Make the cake as per usual and dollop it out into cup cake pans - I find a tablespoon-full makes a nice, small cake, just right for snack-size (I like 'em small, then I feel like I can eat more!). For these small ones bake them for about 20 minutes, or until they've risen and spring back to the touch. When they're thoroughly cold make up some icing. I used a cup of icing sugar and small amount of hot water. Dissolve the coffee in the hot water and add it a bit at a time until you have the consistency you want. Just remember that if you make it runny it'll take FOREVER to set, and also run everywhere, so if it's runnier than you would like add some more icing sugar. I've followed recipes when they state how much icing sugar vs how much water or butter, and they're almost always not quite right, so play with it a little. Then I found some little chocolate sprinkles in the cupboard, et voila, coffee cup cakes! This made about 30 of the li'l buggers. Obviously if you make bigger cakes there'll be fewer, and you may have to cook them a few minutes longer too. Get out there, go crazy, give it a go!
Sunday, November 12, 2006
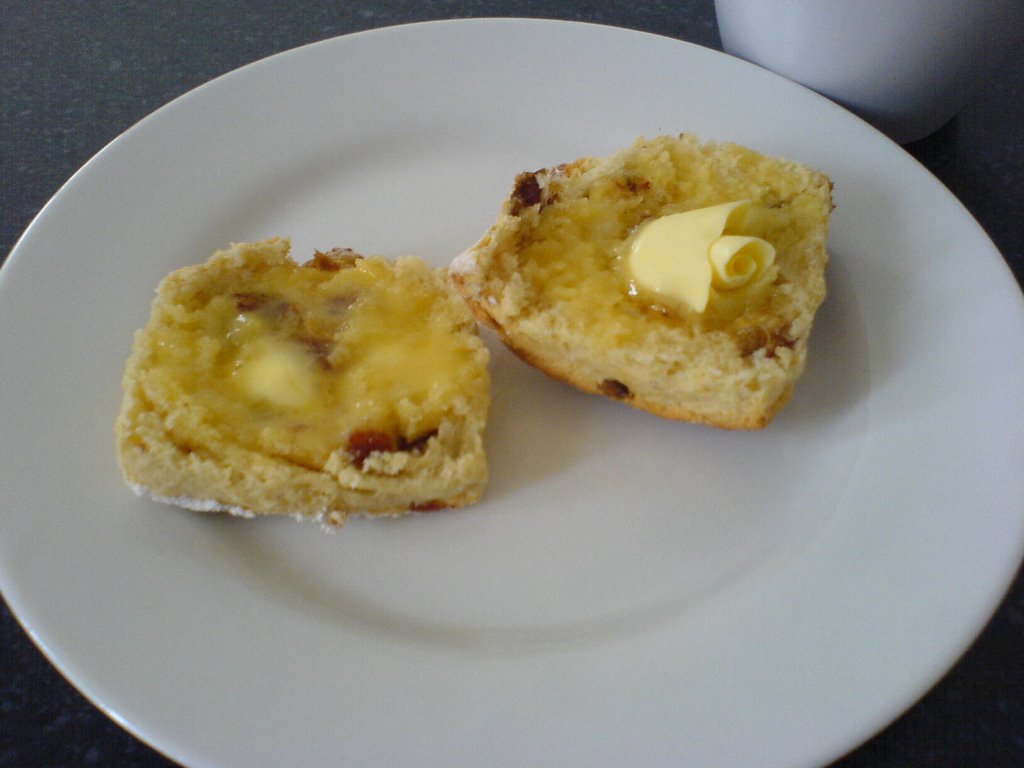
Date Scones
First of all - bad me!! Sorry for not posting for a while, what can I say: things have been busy. BUT, I'm back, and when I can get myself access to the internet outside work I'll most definitely be updating!
So, date scones. Last weekend I finally got around to making my mums Christmas Cake (more on that later when it's finished curing and been iced) and had some dates left over. Now, I love scones, all types of scones, and haven't had date scones in AGES. Now, I'm tired of my usual old scone recipe so, I looked at the back of my trusty White Wings Self Raising Flour and, lo, a recipe for scones! These were plain but I figured, what the hey, let's experiment. And of course I didn't bring the packet with me to the Boy's place, so I'll just have to do it all by memory! So, here 'tis:
Date Scones
3 cups self raising flour
1 tbl caster sugar
80g butter
100g chopped dates
1 cup milk
a few drops of milk, extra
Preheat the oven to 220C. Chop the dates and then soak them in the milk. Sift the flour into a bowl. Add the sugar and butter and rub the mix with your fingertips until it resembles fine bread crumbs. Add the milk and dates and, using a flat knife blade, fold in until the mixture is just combined. Turn onto a floured bench and knead lightly until the dough just holds together. Flatten the dough with the heels of your hands until it's about 2cm thick, then cut it into approximately 5cm squares. Transfer to a floured baking tray. With a pastry brush, brush a little milk to the tops of the scones. Bake for about 14-16 minutes or until golden and cooked through.
Absolutely deeee-lish-us fresh from the oven with a dollop of butter melting in the middle. Apparently, according to my mum, these will keep for up to a week in the fridge - they might get a bit firm, but she says a quick zap in the microwave will do wonders.
I have a few other things stored up to blog: beef stir fry, coffee cup cakes, a review of the Pelican Bistro, and eventually the fabled Mum's Christmas Cake, but all in good time!!
Tuesday, October 17, 2006
Creamy Bacon and Basil Pasta
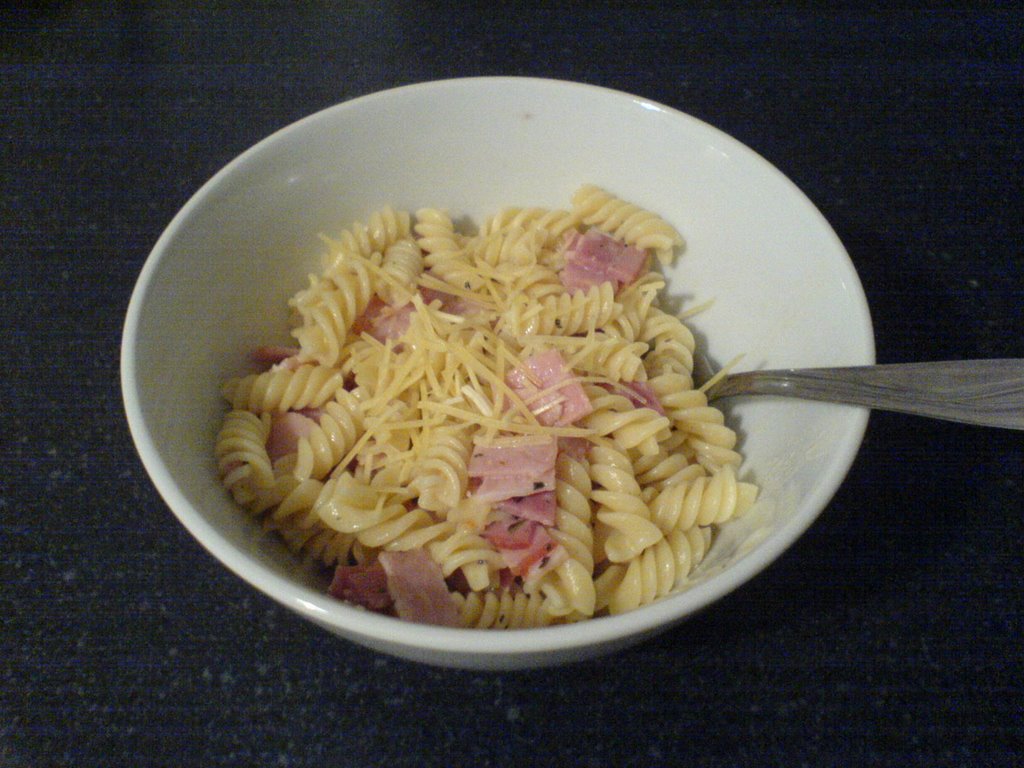
I ate this at Blue Skies (Grnd Flr/ Murray Street Pier Hobart, (03) 6224 3747) restaurant in Hobart and was instantly transported to food heaven. I asked the chef for the recipe, he said "throw this, this, and that in a pan and keep adding a bit until you like the taste". Wise man.
But I was faced with a dilemma - each time I make this it's quite nice (although just NOT on par with the restaurant), but I have NO idea of the quantities. So I asked Mellie for her opinion. And I'll do my best to follow her advice. It really is a "feel your way" type of dish. So stay with me, and if you want to try this do it, and don't be afraid to experiment. The key is to keep taste testing, and it'll all be fine. The whole dish doesn't take long to prepare - put the water on to boil for the pasta, start on the sauce, and it all ends up ready at the same time.
Creamy Bacon and Basil Pasta
Bacon (chopped as chunkily as you like). Pancetta is also nice
Milk (or cream if you want a richer sauce)
Fresh basil (or basil pesto.... there's a difference?!?!?! hehe) Dried herb can also be used, but it's not as nice
Sweet chilli sauce
Pasta (I like spirals, or lasagnettes, but use whatever you like)
Start boiling water for the pasta. Chop up the bacon (I prefer the rindless stuff) and get rid of as much fat as you can. Cook it slowly in a frypan until it's cooked. I prefer a low heat so it doesn't go hard and crunchy. Remove the pan from heat and let it cool slightly. Add the milk - the amount you add will be approximately how much sauce there is. I think I usually go with about a cup for a 2-person serving. Add the basil and a dash of sweet chilli sauce.
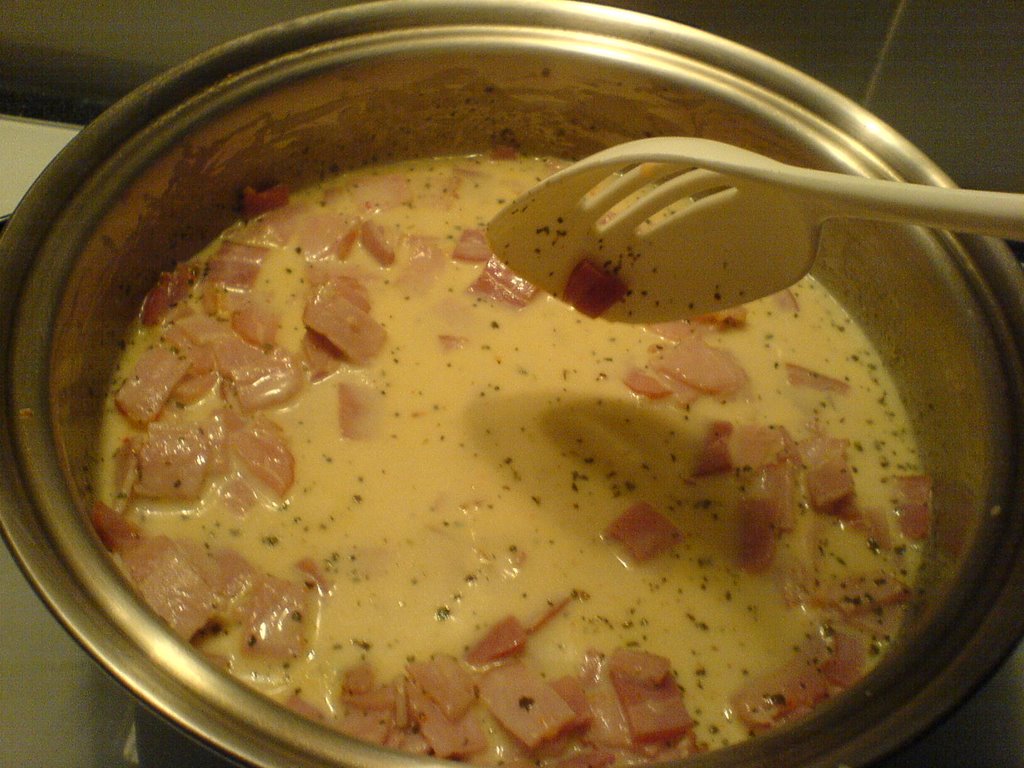 I have found it's best to add the basil in small amounts, testing after each addition for flavour. Same with the chilli sauce! Keep that cooking over a low heat, stirring now and then (by now the pasta should be cooking).
To thicken the sauce up a little I put a small amount of milk into a cup and add about 2 teaspoons of cornflour. Mix it with a fork or small whisk until it's smooth, then add it to the bacon pan. This helps the sauce thicken slightly.
Let the bacon sauce simmer slowly until the pasta is cooked. Drain the pasta then return it to the saucepan. Add the bacon sauce and toss to mix.
Dish it up in a nice bowl with a sprinkling of grated or shaved parmesan. Tres magnifique. Or something.
Again, sorry the recipe is a bit muddled, all I can say is that you really should try it, and experiment with the flavours. You won't regret it.
Tuesday, October 03, 2006
Things a bit quiet on the blogging front...
 I know I've been quiet lately on here... not cooking, nothing since that book review. When I started this I was hoping to post about twice a week. I think I have a pretty good excuse though... my house is finished, and I'm busily moving in and unpacking. It's a big job... and most of my stuff I haven't seen in years, as it's been in boxes and storage. Some things I haven't seen in... wow, 3 years? 4 years? Either way, it's a journey of discovery in many ways, finding things I forgot I had.
And while I did christen my kitchen last night, it was hardly a blog-worthy effort: bottled bolognese sauce, mince, and pasta. While it was quite yummy I don't think I can really take much credit for it!
So keep checking, and soon things will be back to normal on my All My Interests. Until then, wish me luck, and if you want to lend a hand, come on over!
Tuesday, September 26, 2006
Book Review: The Kitchen God's Wife
Title: The Kitchen God's Wife
Author: Amy Tan
Published By: G.P. Putnam's Sons, 1991
This is the second book written by Amy Tan that I've read, the other being "The Hundred Secret Senses". I read both this week and chose to review this one simply because I enjoyed it more. Some may know her from her first piece of work, "The Joy Luck Club".
This book starts now, in the present, and we're introduced to the main characters from the point of view of the daughter to the heroine, then learn more about her mothers life. Her mother and aunt have known each other since "the war" (WW2), and have kept each other secrets for most of their lives, from when they first met in China at the start of the war. We explore Winnie's (the mother) life, her relationships, hardships, and the story of her life during the war, marriage, jail, and finally happiness in America. I really don't know how to review this book without giving too much away. I'm curious how much regarding China and Chinese culture is true, and yet I lack the motivation to go and find out, probably because I want to live with the fiction.
In short, I thought it was a great book, I really like Amy Tan's writing style, and again I hated having to put the book down (to the point where I'd be reading during my lunch break and lose track of time).
Friday, September 22, 2006
Place Review: Panini Bar
Who: Panini Bar
Where: 150 Exhibition Street, Melbourne
A place that Melissa and I have been to a couple of times now is Panini Bar at 150 Exhibition Street in the City. Both times the quality of the food has been high, with the first bites of our respective choices being greeted with enthusiastic nods and "mm-mm" sounds. For something like $6.80 per panini it's pretty good value, as the fillings we've had have been lovely, and definitely filled the hole in the stomach. The next aim for me is to remember to try the place out for breakfast. They apparently also do catering as well, although how well they do this I haven't checked out yet.
Saturday, September 16, 2006
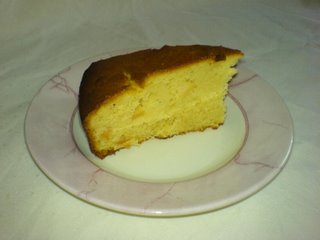
The Best Butter Cake (with something extra)
Cake [keyk]:Macquarie dictionary defines cake as a "sweet baked food in loaf or layer form, usually made from flour, butter, sugar, eggs, etc.
Question: what do you do when you feel like baking, but don't have anything all that special in the house?
Answer: make a butter cake!
The picture really doesn't do it justice.... I could maybe have sprinkled icing sugar on it.... but we've all seen my attempts at "sprinkling" that stuff!
I want to share with you the best all-purpose butter cake recipe I've ever used. It came in a book my mum gave me (thanks mum!) when I was... quick look at the note... just a wee young thing for my 17th birthday. The darned book is HUGE, it's got almost any recipe you might want, and anything it DOESN'T have will be picked up in the book mum gave me for my 18th! As you can see, I've been interested in food for a loooooong time.
This recipe, although a little fiddly, is really very basic, and also works as a good base for adding things. I've added cocoa to make it chocolate (and a little more milk for that one), mashed up banana, and today I tried something new! I had about a handful of dried apple left that I hadn't scarfed, and some cinnamon in the cupboard... there's possibly not enough apple, but it tastes good anyway!
Easy Butter Cake
125g unsalted butter
3/4 cup caster sugar
2 eggs, lightly beaten
1 tsp vanilla essence
2 cups self-raising flour
1/2 cup milk
Preheat the oven to 180C. Prepare a 20cm round cake tin... I don't know about anyone else, but I spray the tin with canola spray then lay baking paper on the bottom - never had a cake stick doing this! Beat the butter and sugar until light and creamy, then gradually add the eggs , beating really well the whole time. Add the vanilla essence and beat until combined. If it's not already, transfer the mix into a large bowl.
Using a metal spoon, fold in the sifted flour alternately with the milk - a bit of one, then a bit of the other, until they're all in. This is also where I add anything extra, like today with the dried apple (chopped up pretty small) and cinnamon. Next time I'll add about two handfuls of apple and about the same amount of cinnamon... I just gave the bottle a shake so not sure of the amount, maybe half a teaspoon? I'm not a cinnamon fan, so others might like more! If all else fails... taste test :) Stir it all until it's just combined and the mix is almost smooth. Spoon it into the cake tin and smooth the top (it looks nicer). Bake for abour 45 minutes or until the cake is cooked (ie. the top springs back when you touch it, or a skewer to the centre comes out clean). Leave the cake in the tin for about 10 minutes before turning it out onto a cooling rack.
If you made this cake often you'd built up some great arm muscles with all that folding, and that's the fiddly part, but it is SO worth it. And I'm quite happy with the way it turned out, quite edible. With a dusting of icing sugar and a dollop of thickened cream.... oooooooh, that'd be nice!
Monday, September 11, 2006
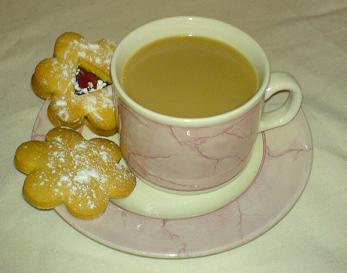
Melting Moments
 I dug out this recipe for Lisa, and then decided to try my hand at them. I mentioned to her the other day that I liked cooking, and she asked if I'd found a recipe for Melting Moments that was pretty simple. It rang a bell, so I went looking. This is so simple I think kids could do it (if you could stop them from eating the batter and 'cream' all the time). Hm, I should consider taking the pictures during the day time, they turn out much better!
I substituted a tiny dribble of vanilla essence as I couldn't get my hands on any passionfruit and the review from my dad was "mmmmm, mmmmm" or something, so I guess it's a success!
Melting Moments and Passionfruit
185b butter, softened
1/2 cup icing sugar, sifted
1/2 cup cornflour, sifted
1 1/4 cup plain flour, sifted
Passionfruit filling:
40g butter, softened
1/4 cup icing sugar
2 tsp passionfruit pulp
icing sugar for dusting
Place butter and icing sugar in a bowl and beat until pale and creamy. Add the flours and mix until combined. Wrap the shortbread dough in cling-wrap and place it in the fridge for half an hour. Preheat the oven to 160C then roll 2-teaspoons-full of mixture into balls and place on a lined baking tray. Flatten the top with the back of a fork and repeat until all the dough is used. Bake for 15 minutes or until the biscuits are only just lightly coloured, then transfer to a cooling rack to cool completely.
To make the passionfruit filling beat the butter and sugar together until pale, then stir in the passion fruit pulp and sandwich two biscuits together with the filling, then dust with icing sugar.
The recipe says it makes 15 biscuits... I came close to this, but also I wasn't measuring out the dough!
Look out work, I'm bringing in the leftovers tomorrow!
Friday, September 08, 2006
Easy Biscuits
I got this recipe quite a while ago off a friend and found it again (on a post-it note, of all things) when I was cleaning my room this week and getting ready to move. It really is a pathetically simple recipe, which is a good thing since all I had were the ingredients, no method! It also works well as a sweet pastry. When you use it to make biscuits it's quite a crisp, bland mix, so either sprinkling it with icing sugar or putting some jam between two biscuits and sprinkling with icing sugar, both of which I've done here, really do make it nice.
Easy Biscuits
125 g butter
115g caster sugar
60ml milk
1 1/2 cups self raising flour
1/2 cup custard powder
Cream the butter and caster sugar. While continuing to mix, add the milk, then sifted flour and custard powder. Keep mixing until all the ingredients are combined, then turn the dough out onto a piece of cling-wrap. Securely wrap the dough and refrigerate for about half an hour.
Preheat the oven to 180C. Remove the dough from the cling wrap and turn out onto a lightly floured board (or in my case, the benchtop). Roll the dough out into a thin sheet, maybe 5mm thick, but it's up to you. Cut biscuits from the dough however you wish - as you can see, I used a cookie-cutter, then took to one biscuit with a knife to make the hole in it. This was an act of desperation after I ransacked the kitchen for a small round "thingy" with which to make the hole and failed to find anything suitable. Place the biscuits on a piece of grease-proof paper on a baking tray and bake until golden brown. Alas, I didn't keep an eye on the time, but I figure it couldn't have been any more than 10 minutes, tops. When they're cooked remove them from the tray onto a wire cooling rack.
I prefer to NOT decorate them until they're ready to be presented. As I don't have a sprinkle-thingy I had to just pinch icing sugar of these to serve, so they could look better, but they still tasted the same!
I also happened along something positively DIVINE: I had a small amount of dough left over so I rolled it out pretty thin in a vaguely rectangular shape, then smeared jam in it and rolled it up. Oooohhhh... the outside went nice and crispy, and inside was this fantastic soft jammy goodness that was just... just... wow, wish I'd made more of them now!
Wednesday, September 06, 2006
Book Review: A Girl Named Disaster
Title: A Girl Named Disaster
Author: Nancy Farmer
Published By: Phoenix House, 1997
The story follows the journey of Nhamo (her name means "Disaster") as she runs from her village in Mozambique and forced marriage (or slavery) to the brother of the man killed by her father before she was born.
On the urging of her grandmother Nhamo flees from the village the night before she is to be delivered to her future husband and travels to Zimbabwe. We follow her through the hardships she faces on this long journey as she struggles to come to terms with leaving everything she knows, and learning to survive on her own.
I found it interesting and was usually disappointed when it was time for me to close the book and get off the train. It's not the genre I usually read, however I enjoyed it very much. There were interesting little facts scattered throughout the book, and the last 12 or so pages are dedicated to a glossary of terms, a brief summary of the history and peoples of Zimbabwe and Mozambique, and the belief system of the Shona (Nhamo's people).
Monday, September 04, 2006
Introducing..... Me!
Hi All,
Welcome to, well, here! I realised that I had had a webpage since I was 17, and that particular webpage was very, very, very, uh, yes, well, um. It hadn't changed much in the last 10 years. Oh wow, 10 years...
Anyway, I decided to have a blog that wasn't just all about me and whatever was going on in my head at the time, but somewhere for me to share the things I really love in life: food, books, and beautiful scenery. I have a number of friends who have various different types of blogs (check out Melissa's Food Blog for some LOVELY food, or Mike and Rosemary's Blog to see what an old schoolfriend and her soon-to-be-husband are up to... eventually I'll list 'em all!), so I decided to ditch the old silly website and start something a little more... mature :-)
BUT, my plans for here... Any new recipes I find, any books I read, if I happen to scrape some money together and go out for dinner (cos hey, Melbourne has some FANTASTIC food), any nice pictures I take... they'll all end up here, hopefully unsullied by any negative incluences.
Wish me luck!
Subscribe to:
Posts (Atom)